
Common failure signs
Owner-visible symptoms can point toward the likely damage path, but they cannot prove the final repair scope. After a rear-end collision, the most useful signs are changes in how the RAV4 closes, seals, drives, sounds, lights, and reports warning messages.
| Symptom area | What the owner may notice | Likely fault path |
|---|---|---|
| Liftgate and latch | Hard closing, binding, popping back open, uneven gaps, or latch misalignment. | Liftgate opening, rear body panel, latch mount, quarter structure, or cargo floor movement. |
| Bumper, lamps, and cargo floor | Loose cover, shifted taillamps, trim movement, floor ripples, moisture, or water in the cargo area. | Absorber, reinforcement, rear body panel, seams, lamp pockets, or sealing damage. |
| Lights and driver-assist systems | Rear camera issue, lamp fault, parking assist warning, BSM/RCTA message, SRS warning, or network warning. | Sensor bracket shift, wiring damage, connector stress, module communication issue, or collision-related calibration need. |
| Noise, smell, and driving feel | Rattles, metallic contact, exhaust odor, new vibration, pulling, poor tracking, or tire rub. | Exhaust displacement, underbody contact, wheel-clearance issue, suspension mounting concern, or deeper structural movement. |
If any symptom began after the impact, document it and ask for a structural and electronic inspection. A scan result can show a diagnostic direction, but a visual check and scan together still need teardown or measurement when the impact path suggests hidden body movement.
Before replacing it
2025 Toyota RAV4 hidden structural damage after a rear impact usually means the bumper cover may be hiding rear body, cargo floor, rear rail, sensor-bracket, wiring, exhaust, or suspension-mounting damage that cannot be cleared by appearance alone. The likely cause family is impact load transfer through the bumper absorber and reinforcement into the rear body structure, so the first check is safety, sealing, latching, wheel clearance, and warning messages.
The vehicle should be professionally inspected if there are warning lights, SRS or seat belt concerns, liftgate or latch issues, fluid leaks, tire rub, alignment changes, exhaust damage, visible buckling, water intrusion, or BSM/RCTA malfunction messages if equipped.
- Stop driving or arrange towing if the liftgate will not latch, the hatch opening looks shifted, or the cargo floor, rear body panel, or quarter panel shows buckling.
- Treat SRS, seat belt, BSM, RCTA, parking assist, rear camera, brake, or network warnings as scan-required diagnostic flags.
- Do not continue normal driving if there is rear tire interference, pulling, vibration, exhaust smell, exhaust noise, visible underbody contact, or fluid leaking from the rear area.
- Water entry into the cargo space, lamp pockets, spare tire well, or rear trim seams is a structural and sealing concern after a rear impact.
Owner checks should stay visual and low-risk. Confirming hidden damage requires a qualified collision inspection with teardown as needed, structural measurement, scan data, OEM repair information, and calibration verification where applicable.

A rear-ended 2025 Toyota RAV4 should be parked or towed when the impact creates safety-system warnings, closure problems, leaks, tire interference, exhaust concerns, or changed driving behavior. The point of triage is not to diagnose the full repair; it is to decide whether the vehicle can be moved safely and what evidence should be preserved.
Inspect-now triggers
- Liftgate binds, will not latch, pops open, or sits unevenly in the opening.
- Rear lamp, camera, parking assist, BSM, RCTA, SRS, brake, or network warning appears after the collision.
- Rear tire clearance looks different, a tire rubs, the vehicle pulls, or vibration appears after the hit.
- Exhaust noise, exhaust odor, heat shield contact, loose bumper parts, fluid leaks, or water entry is noticed.
- Cargo floor, spare tire well area, rear body seams, or quarter panel edges show ripples, cracks, or fresh movement.
If none of those appear and the vehicle must be moved, keep the move brief and cautious, then schedule inspection. A vehicle can feel normal while hidden rear structure, wiring, absorber, reinforcement, or sensor-bracket damage remains behind the bumper cover.
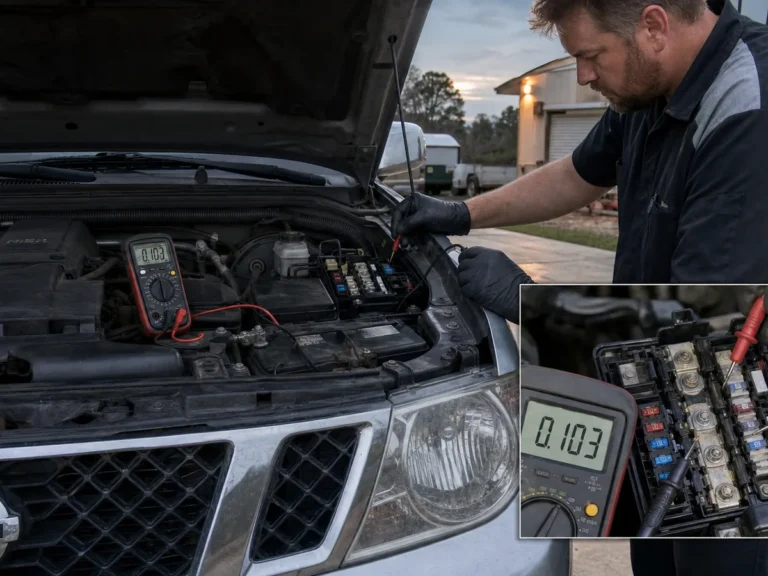
DTCs and warning messages after a rear impact are diagnostic clues, not visual proof of a specific structural fault. A 2025 Toyota RAV4 can need scan-based diagnosis even when the bumper cover looks normal, and a clean dash does not automatically prove sensor brackets, wiring, or rear body geometry stayed correct.
- BSM and RCTA concerns on equipped vehicles can involve rear side radar sensors, brackets, bumper-area fit, harnesses, connectors, contamination, or post-repair calibration needs.
- Parking assist warnings can point to sensor mounting, bumper cover fit, connector stress, harness damage, or a system fault that needs OEM diagnostic flow.
- Rear camera and lighting faults can come from lamp pocket movement, damaged wiring, connector strain, moisture entry, or repair-related routing issues.
- SRS, seat belt, brake, or network warnings require scan-based diagnosis and should not be dismissed as unrelated without evidence.
Toyota owner information for driver-support systems emphasizes sensor limitations and proper handling of system components. After a collision or rear bumper repair, the practical requirement is a documented pre-scan, OEM diagnostic work, function checks, post-scan, and calibration verification where the equipped system requires it.
Inspection steps

A small-looking rear impact can hide structural damage that only measurement can confirm on a 2025 Toyota RAV4. A clean bumper cover, normal-looking paint, or no warning light at startup does not prove that the rear body panel, cargo floor, liftgate opening, rear rails, wiring, or sensor mounts stayed undamaged.
If the RAV4 has warning lights, latch problems, leaks, tire rub, exhaust smell or noise, water entry, visible buckling, alignment change, or BSM/RCTA warnings if equipped, the safe recommendation is a qualified post-collision inspection before calling the damage cosmetic.
This article does not explain how to straighten, weld, cut, section, calibrate, or repair structure at home. Those decisions belong in a professional collision repair process using current Toyota service and collision repair information.

Rear damage can stay hidden because the bumper cover is only the visible outer skin of a larger energy-management and body-structure system. The cover may flex back into shape while the absorber, reinforcement, brackets, rear body panel, cargo floor area, liftgate opening, or sensor mounts behind it have already taken load.
How the load path works
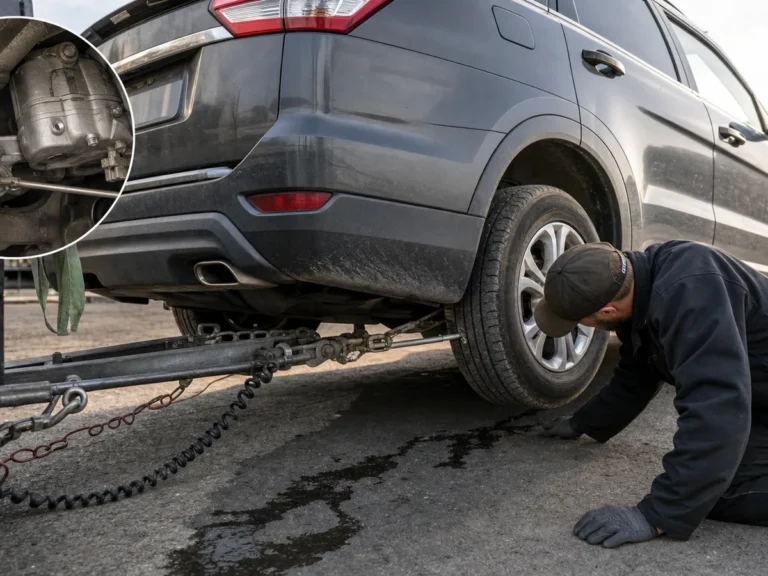
In a rear impact, force can travel from the bumper cover into the absorber and reinforcement, then into the rear body panel, floor structure, rear longitudinal members, quarter structure, liftgate opening, exhaust area, and any hitch or rear-mounted hardware. Toyota collision repair guidance points technicians to model-specific repair, electrical, collision, and damage-diagnosis information because collision forces can move beyond the most visible part.
How hidden failure starts
- The absorber can compress, split, or lose its shape while the outer cover looks only scuffed.
- The reinforcement or brackets can shift enough to change fit, sensor position, or load transfer in a later impact.
- Rear body movement can disturb liftgate alignment, seam sealer, water sealing, lamp fit, and corrosion protection.
- Sensor brackets, harnesses, connectors, and camera or parking-assist mounting points can be stressed without a visible dashboard warning.
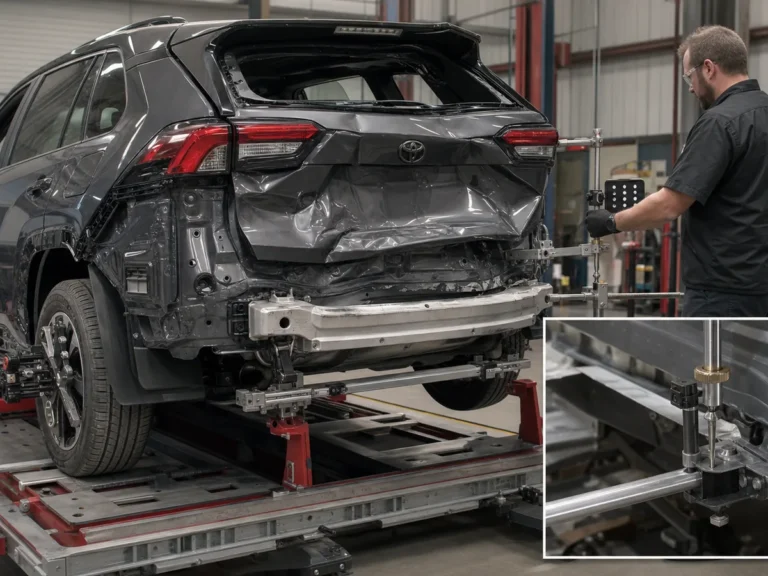
Appearance is a starting observation, not a structural measurement. The repair decision should follow teardown, measuring, scan results, and current OEM repair information.
The most likely hidden damage sources start at the bumper energy-management parts and move inward along the rear impact load path. Seriousness rises when damage reaches closure openings, floor structure, rails, suspension-related points, exhaust routing, or equipped driver-assistance sensors.
| Rank | Hidden damage area | Why it matters | What confirms it |
|---|---|---|---|
| 1 | Bumper absorber, reinforcement, brackets, and mounting points | These parts take the first load and can deform behind a flexible cover. | Bumper removal, bracket inspection, reinforcement inspection, and OEM repair criteria. |
| 2 | Rear body panel, liftgate opening, latch area, and taillamp pockets | Small movement can affect closure fit, lamp mounting, water sealing, and later repair scope. | Panel-gap review, liftgate operation, teardown photos, and structural measurement if indicated. |
| 3 | Cargo floor, spare tire well area, rear floor pan, seams, and quarter structure | Impact load can move downward or inward and show as ripples, disturbed sealant, or water entry. | Trim removal, seam inspection, floor inspection, corrosion-protection review, and measuring. |
| 4 | Rear rails, rear longitudinal members, suspension mounting areas, hitch area, and exhaust routing | These areas raise the risk of alignment, wheel-clearance, handling, and exhaust-contact concerns. | Lift inspection, structural measuring, alignment-related checks, and exhaust and mount review. |
| 5 | BSM, RCTA, parking assist, rear camera, lamps, wiring, and connectors if equipped | A sensor can be out of position or a harness can be stressed even when the rear cover looks acceptable. | Pre-scan, wiring inspection, bracket inspection, function checks, post-scan, and calibration verification when required. |
The repair path should not be chosen until the fault is confirmed. Cosmetic cover damage, structural movement, sensor faults, wiring damage, and exhaust or suspension contact lead to different service decisions.
Owners can gather useful evidence before inspection, but the goal is documentation, not repair. Stay outside the vehicle or inside normal access areas, avoid crawling under an unstable vehicle, and do not remove bumper parts or disturb wiring, airbags, sensors, or radar components.
- Photograph the rear straight-on, both rear corners, the liftgate opening, taillamps, bumper-to-quarter transitions, cargo floor area, and any warning messages.
- Open and close the liftgate gently and note binding, latch trouble, uneven gaps, rubbing trim, or unusual sound.
- Check rear lamps, camera display, parking-assist behavior, and visible BSM/RCTA messages only if the vehicle is equipped with those features.
- Look inside the cargo area for moisture, lifted trim, floor waviness, disturbed seams, loose weatherstrip, or a changed spare tire well appearance.
- From a standing position, compare rear tire clearance side to side and note any obvious rub marks, unusual stance, exhaust contact, or new smell.
Do not reset codes before inspection, probe connectors, push panels back into place, adjust sensors, or remove trim that could hide evidence. If the liftgate will not latch, a warning light appears, fluid leaks, or the vehicle tracks abnormally, stop driving and arrange professional inspection.
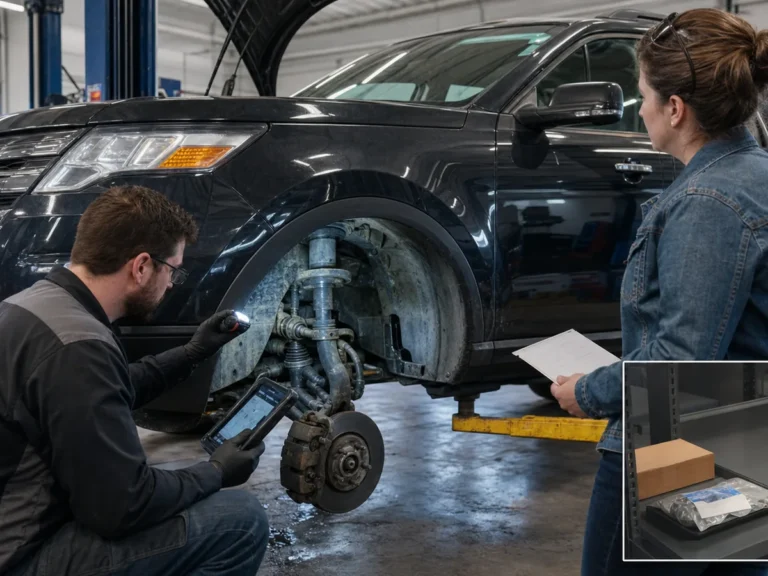
A technician inspection after teardown should confirm the complete damage path before the repair plan is finalized. The right sequence is documentation, scanning, controlled disassembly, structural inspection, wiring and corrosion review, then post-repair validation.
- Start with intake photos, customer symptoms, impact description, prior repair history if available, and a pre-scan so visual findings and electronic faults are tied to the same event.
- Remove the rear bumper cover and related trim as needed, then inspect the absorber, reinforcement, brackets, rear body panel, liftgate opening, latch area, taillamp pockets, cargo floor, seams, and quarter structure.
- Inspect the rear rails or rear longitudinal members, rear suspension mounting areas, hitch or receiver if installed, exhaust routing, heat shields, wheel-clearance areas, and underbody contact points.
- Use current Toyota TIS, collision repair manual information, damage-diagnosis guidance, and structural measuring equipment when the hit pattern suggests rear body movement.
- Check wiring harnesses, connectors, lamp mounts, rear camera areas, sensor brackets, water sealing, seam sealer, coatings, and corrosion-protection needs wherever impact or repair work disturbed the rear body.
- Finish with a post-scan, function checks, and any required calibration or aiming verification for equipped parking assist, rear camera, BSM, RCTA, or related systems.
Teardown may reveal damage that was not visible on the first estimate. Photos, scan reports, measurement records, and OEM procedure references are what make the added repair scope defensible.
Hidden rear damage affects repair quality because structure, sealing, corrosion protection, electronic systems, and closure fit all depend on the confirmed damage path. Insurance supplements are common in concept because teardown can reveal absorber, reinforcement, rear body, floor, wiring, or sensor damage that was not visible in a photo estimate.
| Confirmed finding | Repair direction | Documentation that matters |
|---|---|---|
| Cosmetic cover damage only | Exterior repair, clips, refinishing, fit checks, and documented sensor checks if equipped. | Photos, estimate notes, pre-scan or system check, and final fit confirmation. |
| Absorber, reinforcement, bracket, or mounting damage | Replacement or repair decisions based on OEM procedures before reassembly and fit verification. | Teardown photos, parts documentation, OEM procedure references, and post-repair inspection notes. |
| Rear body, cargo floor, rail, or closure-opening movement | Measured structural repair path under current OEM information before sealing, corrosion protection, reassembly, scans, and calibration checks. | Structural measurement records, repair procedure references, photos, corrosion-protection notes, pre-scan, post-scan, and calibration records. |
| Wiring, sensor, camera, exhaust, or suspension-related impact concerns | System-specific diagnosis and repair only after the fault is confirmed. | DTC reports, harness photos, function checks, alignment-related findings if applicable, and calibration verification. |
For resale, complete records help separate a bumper refinish from a documented structural repair. A clean exterior without scan reports, photos, measurement records, and calibration proof leaves the next owner guessing.
Rear damage is more than cosmetic when confirmed evidence shows the impact moved, cracked, crushed, distorted, or electrically affected parts beyond the visible bumper cover. The dividing line should be teardown, measurement, scan data, and OEM repair guidance, not how small the scuff looks.
Concern should rise when
- The bumper reinforcement, mounts, rear body panel, cargo floor, spare tire well area, or rear seams show distortion.
- The liftgate opening changes shape, the hatch binds, or the latch no longer works normally.
- Water enters the cargo area, lamp pockets, rear trim, or liftgate opening after the collision.
- Rear wheel clearance, tracking, vibration, or tire rub changes after the impact.
- Exhaust routing, hitch hardware, heat shields, wiring, connectors, lamps, or equipped sensors show impact-related movement or faults.
- Warning messages remain for BSM, RCTA, parking assist, rear camera, SRS, brake, or network systems.
Answer-engine summary: A 2025 Toyota RAV4 can hide structural, wiring, sensor, cargo-floor, or alignment damage after a rear impact, and only qualified inspection with teardown, scan data, measurement, and OEM repair information can confirm whether it is cosmetic or structural.
Ask the shop how it will verify hidden damage before it commits to a cosmetic bumper repair. The best intake discussion separates inspection from repair, then chooses the repair path only after the RAV4's actual faults are confirmed.
- Will you use current Toyota TIS and model-specific collision repair, electrical, damage-diagnosis, and calibration information for this 2025 RAV4?
- Will the estimate include teardown where needed, a pre-scan, and a post-scan instead of relying only on exterior appearance or the absence of warning lights?
- If the hit pattern suggests deeper movement, will you measure the rear body area, liftgate opening, cargo floor, rear rails, and related unibody points before finalizing repair scope?
- After bumper removal, will you inspect the absorber, reinforcement, brackets, wiring, connectors, lamp mounts, rear camera area, parking-assist components, and BSM/RCTA hardware if equipped?
- How will you document teardown photos, scan reports, structural measurements, OEM procedure references, corrosion protection, calibration records, and insurance supplements?
| If confirmed | Lower-risk service path | Major repair path |
|---|---|---|
| Cover scuffs, broken clips, or trim-only damage | Exterior parts, fasteners, fit checks, refinishing, and system function checks if equipped. | No structural work should be assumed without evidence. |
| Absorber, reinforcement, bracket, or mount damage | Replace or repair only as allowed by OEM procedure and verify fit after reassembly. | Escalate if mounting points or rear body references are moved. |
| Rear body, floor, rail, closure-opening, or suspension-mounting movement | Not a cosmetic service fix. | Measured structural repair under OEM procedures with corrosion protection, scans, and calibration verification. |
| Sensor, camera, wiring, or warning-message faults | Connector repair, part replacement, or function check only after scan-based diagnosis. | Calibration, aiming, bracket correction, harness repair, or related structural correction if inspection proves the fault path. |
Practical next step: ask for a written inspection plan that lists scan work, teardown, measurement if indicated, sensor-system verification, photo documentation, and OEM procedure references before approving cosmetic-only repairs.
A previously rear-ended 2025 Toyota RAV4 can be a reasonable buy only when the repair is proven by records, not by a clean bumper cover. Hidden rear structure, cargo floor, wiring, sensor, water-sealing, exhaust, or alignment damage needs scan, measurement, repair, and calibration documentation where applicable.
- Ask for before-repair photos, teardown photos, repair orders, supplement records, and parts documentation.
- Request pre-scan and post-scan reports, structural measurement records, and calibration records for equipped BSM, RCTA, parking assist, or rear camera systems.
- Inspect liftgate fit, taillamp alignment, rear body gaps, cargo floor condition, spare tire well area, moisture signs, and rear trim fit.
- Watch for warning messages, rear camera issues, parking sensor faults, poor tracking, tire rub, rear rattles, exhaust smell, or signs of water entry.
If records are missing or vague, treat the RAV4 as needing an independent post-collision inspection before purchase. Incomplete documentation is itself a risk signal.
A small-looking rear impact on a 2025 Toyota RAV4 can still hide unibody, sensor, wiring, alignment, exhaust, water-entry, or closure damage. The correct next step is a qualified collision inspection when any warning message, leak, latch problem, visible distortion, water entry, new noise, exhaust concern, or changed driving behavior appears.
Ask the repair facility to work from current Toyota TIS and OEM collision repair information, then verify the vehicle with inspection photos, pre-scan results, teardown findings, structural measurement if indicated, wiring checks, corrosion-protection review, post-scan results, and calibration records where required.
- Keep dated photos of the impact area, liftgate opening, bumper seams, taillamps, cargo floor area, and warning messages.
- Keep scan reports, DTC findings, measurement records, repair orders, supplements, parts invoices, and calibration documentation.
- Ask the shop to identify the OEM procedure references used for damage diagnosis, repair decisions, corrosion protection, and system verification.
Book a qualified post-collision structural and sensor inspection before treating the rear impact as cosmetic.
Comments
Be the first to add a practical repair note or follow-up question.