
What this part does
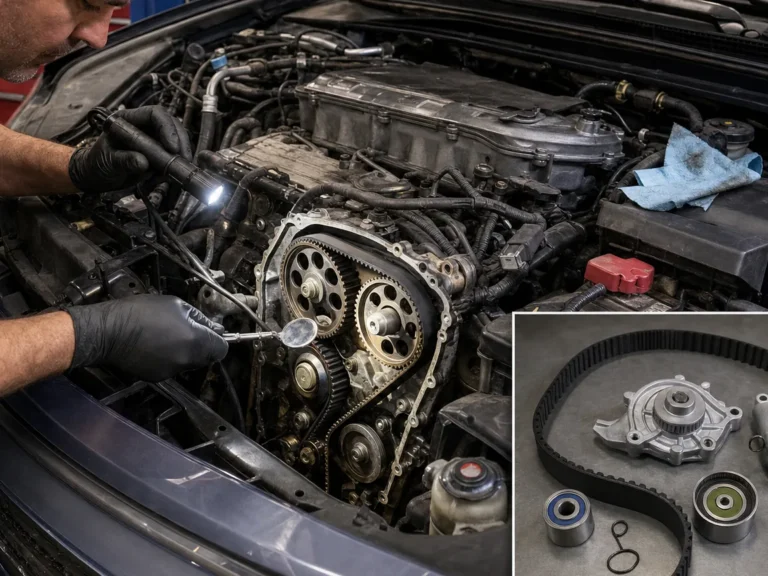
The auxiliary belt is a mechanical link between the crank pulley and the accessory pulleys. On a Transit Mk6, the exact layout can vary by engine and equipment, so the correct belt path and belt length must be verified rather than copied from another van.
- The crank pulley drives the belt around the accessory circuit.
- Grooved pulleys guide the ribbed side of the belt where the belt needs grip.
- Smooth pulleys normally run on the back of the belt and help control belt path.
- The tensioner keeps the belt tight enough to stay engaged under changing engine load.
- Idler pulleys support belt routing and can throw the belt if their bearings seize or lean.
- Accessory pulleys such as alternator or power steering pulleys must spin freely and stay aligned.
A smooth pulley is not automatically wrong. Its job depends on belt routing. What matters is whether the pulley belongs in that position, spins correctly, and lines up with the rest of the belt path.
Common failure signs
The main warning sign is a sudden loss of belt-driven accessory function. If steering assistance changes, the battery warning light appears, or the belt is found hanging loose, treat the van as needing immediate inspection rather than a roadside belt refit.
- Belt squeal before failure can indicate slip, poor tension, pulley drag, or contamination.
- A battery warning light can appear when the alternator is no longer being driven.
- Power steering suddenly heavy can indicate the power steering pump has stopped being driven.
- A hot rubber smell can come from belt slip, a seized pulley, or belt contact with the wrong surface.
- Visible fraying, missing ribs, glazing, cracking, or shredded sections mean the belt should not be reused.
- A belt that comes off again after refitting usually means the root cause was not found.
- Brake assistance symptoms should be treated cautiously because assist systems vary by engine and layout.
Stop driving if steering assistance, charging, brake assistance, or cooling-related belt drive is affected. A short limp to a safe stopping place is different from deciding the vehicle is safe to use.
Before replacing it
A scan may show charging or system-voltage related warnings after the auxiliary belt has come off, but the scan does not replace inspection of the tensioner, idlers, crank pulley, accessory bearings, belt routing, and belt condition.
- Use warning lights to understand which systems lost drive or electrical support.
- Check the belt drive before clearing codes or replacing electrical parts.
- Treat battery or charging warnings as a consequence until alternator drive and charging function are confirmed.
- Do not diagnose an alternator, power steering pump, or sensor from warning lights alone after a belt-off event.
- After repair, recheck warning lights and charging behavior as part of verification.
The belt-off event is diagnosed visually and mechanically first. DTCs may help describe the aftermath, but they do not prove belt length, pulley alignment, tensioner health, or bearing condition.

Before replacing the belt, look for obvious evidence of why it came off. The useful first check is not forcing the belt back on; it is finding whether the belt drive has a visible fault that would immediately repeat the failure.
- Photograph the belt path before moving anything if the belt is still partly routed.
- Look for shredded belt strands wrapped around pulleys or brackets.
- Check whether any pulley appears tilted, loose, missing a cover, or sitting out of line.
- Look for oil, coolant, or diesel contamination on the belt or pulley surfaces.
- Check whether the belt ribs are missing, split, or riding over the edge of a pulley.
- Note any recent belt, tensioner, pump, alternator, or power steering repair history.
- Confirm whether the van has air conditioning or another accessory layout difference before ordering a belt.
- Do not run the engine to watch the belt path if the belt is loose, damaged, or partly detached.
Owner-safe does not mean diagnosis is complete. It means you can identify obvious stop signs before a technician releases belt tension, removes parts, or checks bearing load.
Inspection steps

Start with components that guide and tension the belt because they are most directly responsible for belt tracking. A seized idler, weak tensioner, or pulley that leans out of line can pull the belt off even if the belt itself looks usable at first glance.
| Rank | Likely cause | What to look for | Why it throws the belt |
|---|---|---|---|
| 1 | Failed tensioner or tensioner pulley | Weak spring action, rough pulley, loose arm, poor belt contact, or tensioner sitting outside its normal travel range | The belt can lose control under load and walk off the pulley set |
| 2 | Seized or worn idler pulley | Pulley does not spin freely, feels gritty, leans sideways, or has loose mounting hardware | The belt can be dragged sideways or forced to run on a locked surface |
| 3 | Damaged belt | Frayed edges, missing ribs, glazing, cracks, shredding, or heat damage | A weakened belt can mistrack, slip, or split under accessory load |
| 4 | Wrong belt, wrong routing, or wrong accessory layout | Belt too long, belt too short, incorrect path, or mismatch between air-conditioning and non-air-conditioning layouts | Incorrect wrap and tension can prevent the belt from staying seated |
| 5 | Oil or coolant contamination | Wet belt, slick pulley grooves, leaks above the belt path, or residue on smooth pulleys | Contamination reduces grip and can damage the rubber |
| 6 | Crank pulley or damper issue | Visible wobble, shifted pulley face, damaged rubber section, or abnormal tracking marks | The belt path can move out of line at the drive source |
| 7 | Accessory pulley seizure | Alternator, power steering, air-conditioning, or other accessory pulley does not turn normally | A locked or dragging accessory can overload and eject the belt |
| 8 | Pulley misalignment or loose hardware | A pulley sits forward, backward, or angled compared with the rest of the belt line | The belt follows the angled pulley and walks off the system |

Once the engine is off and the belt is removed, inspect the system in a fixed order. Skipping straight to refitting can miss the failed idler, worn tensioner, contaminated belt, loose accessory, or incorrect belt length that caused the original failure.
- Inspect the removed belt for edge wear, rib loss, cracking, glazing, heat marks, contamination, and uneven wear across its width.
- Verify the belt part number, length, and routing against the exact engine code and accessory layout before using it again.
- Release and move the tensioner through its travel using the correct service method, checking for smooth movement, spring resistance, damage, or a rough tensioner pulley.
- Spin every idler pulley by hand and feel for roughness, looseness, binding, seized bearings, or a pulley that does not sit square.
- Check the alternator pulley and clutch pulley if fitted, without assuming every variant uses the same alternator design.
- Check the power steering pulley and other accessory pulleys for bearing drag, wobble, damaged grooves, and secure mounting.
- Inspect the crank pulley or harmonic damper for visible wobble, shifted rubber, cracking, or signs that the belt has been tracking off-center.
- Sight along the pulley faces to look for misalignment, a bracket issue, a loose bolt, or an accessory sitting out of plane.
- Clean or repair any oil or coolant leak that has contaminated the belt path before installing a replacement belt.
- Replace confirmed failed parts, refit the correct belt, then run and recheck that the belt tracks cleanly without walking toward an edge.
Use OEM or manufacturer repair information for engine-specific routing and service steps. This article does not supply universal Transit Mk6 torque specs, belt lengths, or pulley procedures because those depend on the exact variant.
Belts themselves should be bought new. Used accessories, brackets, or pulleys should be treated cautiously because a hidden bearing fault or bent mounting face can recreate the same belt tracking problem.
- Do not buy a used belt as the repair part.
- Check any used pulley for visible groove damage, edge wear, corrosion, or signs of heat.
- Confirm the pulley spins smoothly without roughness, binding, or side movement before fitting.
- Check mounting faces and bolt holes for damage that could put the pulley out of line.
- Match the part to the engine code, accessory layout, and air-conditioning status where relevant.
- Avoid a used tensioner if its spring action, stop position, pulley bearing, or service history cannot be verified.
- For a used alternator or pump, inspect the pulley as part of the purchase decision, not after installation.
A cheap used part is not good value if it leaves the belt running out of line. The belt path is only as reliable as the weakest pulley, bearing, bracket, or tensioner in the circuit.
Replacement notes
Do not reuse an old belt if it is glazed, cracked, frayed, oil-soaked, coolant-soaked, shredded, stretched, or damaged on one edge. A belt that came off cleanly may still have internal damage from heat, twist, or pulley contact.
| Repair path | Use when | Avoid when |
|---|---|---|
| Belt only | The belt is being replaced as preventive service and all pulleys, tensioner movement, alignment, routing, and contamination checks are good | The belt has already fallen off without a confirmed external cause |
| Belt and idler pulley | An idler is rough, seized, loose, leaning, or has damaged bearing feel | Other pulleys are also noisy or the tensioner is weak |
| Belt and tensioner | The tensioner pulley is rough, the arm does not move correctly, or belt load control is suspect | A seized accessory or crank pulley issue is the actual confirmed fault |
| Belt kit | Multiple guide components are worn or the belt drive has age-related wear across tensioner and idlers | The failed component is an accessory pulley that still needs separate repair |
| Accessory or crank pulley repair | The alternator, power steering pump, crank pulley, or another driven component shows seizure, wobble, misalignment, or pulley damage | The pulley problem has not been verified |
After refitting, verify that the belt stays centered, the dashboard warning lights clear as expected, steering assistance is normal, and no pulley noise or belt edge movement appears during a controlled check.
Use a vehicle-specific parts path if the belt markings are unreadable, the van has had recent belt-drive work, or the accessory layout is uncertain. Registration, engine code, and a clear photo of the belt path help prevent wrong-belt or wrong-routing mistakes.
- Use the Transit auxiliary belt replacement guide for model-specific service context.
- Use the battery warning light guide if the charging light stayed on after belt refit.
- Use the power steering guide if steering assistance changed before or after belt loss.
- Use the alternator pulley noise guide if pulley noise or one-way pulley behavior is suspect.
- Use the crankshaft pulley symptoms guide if belt tracking starts at the crank pulley.
- Use the belt squeal guide if noise appeared before the belt came off.
Source context reviewed: https://mechanics.stackexchange.com/questions/102221/transit-mk6-auxliiary-drive-belt-fell-off-what-to-check-when-refitting
FAQ
Can I drive a 2003 Transit Mk6 if the auxiliary belt has fallen off?
Do not keep driving if steering assistance, charging, brake assistance, or any belt-driven critical function is affected. Move only as needed to reach a safe place, then inspect the belt drive or arrange professional diagnosis.
Can I reuse the old auxiliary belt?
Only consider reuse for inspection or controlled movement if the belt is undamaged, dry, correctly specified, and the cause of belt loss has been found. Replace it if it is glazed, cracked, frayed, contaminated, shredded, stretched, or edge-worn.
How do I know the tensioner is bad?
A suspect tensioner may have rough pulley bearings, weak or uneven spring movement, a loose arm, damage, or belt tracking that moves toward an edge. Confirm with the correct service procedure rather than judging by age alone.
Why did the new belt come off?
A new belt can come off if the original cause was still present, such as a seized idler, weak tensioner, wrong belt length, incorrect routing, contamination, crank pulley issue, accessory seizure, or pulley misalignment.
Will a scan tool tell me why the belt came off?
A scan tool may show charging-related warnings after the alternator stopped being driven, but it will not prove the mechanical cause. Inspect the belt, pulleys, tensioner, alignment, and accessory bearings first.


Comments
Be the first to add a practical repair note or follow-up question.